기본 콘텐츠로 건너뛰기

javascript 객체와 반복문, in, with


객체와 반복분
1
2
3
4
5
6
7
8
9
10
11
12
13
14
15
16
17
<script>
        //객체 선언
        var product = {
            name'Microsoft Visual Studio 2013 Ultimate',
            price: '15,000,000원',
            language: '한국어',
            supportOS: 'Win 32/64',
            subscription: true
        };
        //출력
        var output = '';
        for (var key in product) {
            output += '●' +key+ ' : '+product[key] + '\n';
        }
        alert(output);
    </script>
cs


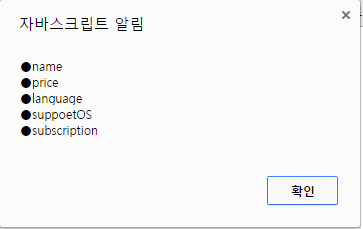
반복문을 사용하여 객체의 속성보기

for in 반복문에 객체를 넣으면 객체의 요소 갯수만큼 반복문을 실행한다.
이때 코드의 변수 key에는 객체의 키값이 들어간다.

name, price, lacguage, supportOSsubscription가 key이다.

1
2
3
4
5
6
7
8
9
10
11
12
13
14
15
16
17
<script>
        /객체 선언
        var product = {
            name'Microsoft Visual Studio 2013 Ultimate',
            price: '15,000,000원',
            language: '한국어',
            suppoetOS: 'Win 32/64',
            subscription: true
        };
        //출력
        var output = '';
        for (var key in product) {
            output += '●' +key+ '\n';
        }
        alert(output);
    </script>
cs
키만 출력을 해보자


1
2
3
4
5
6
7
8
9
10
11
12
13
14
15
16
17
<script>
        //객체 선언
        var product = {
            name'Microsoft Visual Studio 2013 Ultimate',
            price: '15,000,000원',
            language: '한국어',
            suppoetOS: 'Win 32/64',
            subscription: true
        };
        //출력
        var output = '';
        for (var key in product) {
            output += '●' + product[key] + '\n';
        }
        alert(output);
    </script>
cs
키값을 출력을 해보자


key와 product[key]에 따른 값을 띄어보았다.


in키워드와 with키워드

in키워드 사용

1
2
3
4
5
6
7
8
9
10
11
<script>
        //객체선언
        var student = {
            이름: '멍개',
            국어: 100, 영어: 100,
            수학: 100, 과학: 100
        };
        alert('이름' in student);
    </script>
cs
객체 내부에 키가 있는지 없는지 검사를 할 때 사용된다
srudent 객체 내부에 이름 이라는 key가 있으면 true값을 반환을 하고, 그렇지 않으면 false값을 반환을 한다.

 
F12를 눌러서 개발자 콘솔창?(명칭이 정확히 기억이 안나네 ㅋㅋㅋㅋㅋ) 여기서 확인을 해보니 
console.log('이름' in student);는 true값이 뜨고
console.log('dlfasd' in student);는 false값이 반환이 된다.


with키워드 사용

1
2
3
4
5
6
7
8
9
10
11
12
13
14
15
16
17
18
<script>
        //객체선언
        var student = {
            이름: '멍개',
            국어: 100, 영어: 100,
            수학: 100, 과학: 100
        };
        var output = '';
        output += '이름: ' + student.이름 +  '\n';
        output += '국어: ' + student.국어 +  '\n';
        output += '영어: ' + student.영어 +  '\n';
        output += '수학: ' + student.수학 +  '\n';
        output += '과학: ' + student.과학 +  '\n';
        
        alert(output);
    </script>
cs

위와 같은 코드는 매우매우매우매우 치기가 귀찮다..
매번 student를 치기가 귀찮 with키워드를 쓰면 student를 매번 치지 않아도 된다

with(객체){
//코드
}
의 꼴을 갖는다.


1
2
3
4
5
6
7
8
9
10
11
12
13
14
15
16
17
18
19
<script>
        //객체선언
        var student = {
            이름: '멍개',
            국어: 100, 영어: 100,
            수학: 100, 과학: 100
        };
        var output = '';
        with (student) {
            output += '이름: ' + 이름 + '\n';
            output += '국어: ' + 국어 + '\n';
            output += '영어: ' + 영어 + '\n';
            output += '수학: ' + 수학 + '\n';
            output += '과학: ' + 과학 + '\n';
        }
        alert(output);
    </script>
cs
위코드와 같은 결과를 출력 한다.


with 충돌
만약에 객체 안에있는 키와 외부 변수가 같은 것이 존재한다면 충돌을 일으킨다.
이런 경우는 객체안에 있는 속성이 우선순위가 높다.

1
2
3
4
5
6
7
8
9
10
11
12
13
14
15
16
17
18
19
 <script>
        //객체선언
        var student = {
            이름: '멍개',
            국어: 100, 영어: 100,
            수학: 100, 과학: 100,
            output : '이미 있지롱~~~~~'
        };
        var output = '';
        with (student) {
            output += '이름: ' + 이름 + '\n';
            output += '국어: ' + 국어 + '\n';
            output += '영어: ' + 영어 + '\n';
            output += '수학: ' + 수학 + '\n';
            output += '과학: ' + 과학 + '\n';
        }
        alert(output);
cs
student객체 안에 output이있고, 외부 변수로 output이 있기때문에 충돌이 일어난다.
속성인 output이 우선순위가 높기 때문에 아무것도 출력되지 않는다.


충돌 해결법
1
2
3
4
5
6
7
8
9
10
11
12
13
14
15
16
17
18
19
20
<script>
        //객체선언
        var student = {
            이름: '멍개',
            국어: 100, 영어: 100,
            수학: 100, 과학: 100,
            output : '이미 있지롱~~~~~'
        };
        var output = '';
        with (student) {
            window.output += '이름: ' + 이름 + '\n';
            window.output += '국어: ' + 국어 + '\n';
            window.output += '영어: ' + 영어 + '\n';
            window.output += '수학: ' + 수학 + '\n';
            window.output += '과학: ' + 과학 + '\n';
        }
        alert(output);
    </script>
cs
객체 내부 변수와 외부 변수가 같으면 window 변수의 output을 쓰겠다고 지정을 해준다.

window객체는 jacascript의 최상위 객체이다.
javascript의 모든 객체와 메서드는 widow 객체의 속성과 메서드이다.
alert()도 window.alert()메서드 형태로 사용이 가능


댓글

이 블로그의 인기 게시물

[git] pull을 하여 최신코드를 내려받자

보면 먼가 로고가 다르게 뜨는것을 확인을 할 수가있다. C:\Users\mung\Desktop\etc\study\python-gene>git checkout remotes/origin/master Note: checking out 'remotes/origin/master'. You are in 'detached HEAD' state. You can look around, make experimental changes and commit them, and you can discard any commits you make in this state without impacting any branches by performing another checkout. If you want to create a new branch to retain commits you create, you may do so (now or later) by using -b with the checkout command again. Example:   git checkout -b HEAD is now at 29e282a... fetch test C:\Users\mung\Desktop\etc\study\python-gene>git branch * (HEAD detached at origin/master)   master   test1   test2 깃이 잘 쓰면 참 좋은놈인데 어지간히 쓰기가 까다롭다. 처음에 깃을 푸시 성공하는데만 한달정도 걸렸던걸로 기억이 난다.. ㅋㅋㅋ 여담으로  깃 프로필을 가면 아래사진 처럼 보인다. 기여도에 따라서 초록색으로 작은 박스가 채워지는데 저걸 잔디라고 표현을 한다고 합니다 ㅎ 저 사진은 제 깃 기여도 사진입니당 ㅋㅋㅋㅋ 다시 본론으로 돌아와서 ㅋㅋ pull을 하면...

[kali linux] sqlmap - post요청 injection 시도

아래 내용은 직접 테스트 서버를 구축하여 테스트 함을 알립니다.  실 서버에 사용하여 얻는 불이익에는 책임을 지지 않음을 알립니다. sqlmap을 이용하여 get요청이 아닌 post요청에 대해서 injection공격을 시도하자. 뚀한 다양한 플래그를 이용하여 DB 취약점 테스트를 진행을 해보려고 한다. 서버  OS : windows 7 64bit Web server : X Server engine : node.js Framework : expresss Use modules : mysql Address : 172.30.1.30 Open port : 6000번 공격자 OS : kali linux 64bit use tools : sqlmap Address : 172.30.1.57 우선 서버측 부터  1 2 3 4 5 6 7 8 9 10 11 12 13 14 15 16 17 18 19 20 21 22 23 24 25 26 27 28 29 30 31 32 33 34 35 36 37 38 39 40 41 42 43 44 45 46 47 48 var  express  =  require( 'express' ); var  app  =  express(); var  mysql  =  require( 'mysql' ); var  ccc  =  mysql.createConnection({     host: '127.0.0.1' ,     user: 'root' ,     pos...

[node.js] 파일 리더기 만들기 - 사용 모듈 정리, pdf 구조, hwp 구조

pdf -> html 변환 가장 무난하다. 기본적으로 pdf는 htm와 비슷한 형태의 구조를 가지고 있다. 크게 header , body , xref table , trailer 의 구조로 되어있다. pdf는 환경에 상관없이 표현을 하기 위한 목적을 가지고 있는 파일이다. 이런 이유 때문에 무난히 진행이 된 것 같다. pdf2htmlex와 pdftohtmljs라는 모듈을 이용을 했다. var pdftohtml = require ( 'pdftohtmljs' ) ; var converter = new pdftohtml ( 'test.pdf' , "sample.html" ) ; converter . convert ( 'ipad' ) . then ( function ( ) { console . log ( "Success" ) ; } ) . catch ( function ( err ) { console . error ( "Conversion error: " + err ) ; } ) ; 이미지나, text같은 것들이 거의 100%로 변환이 된다. docx -> html 변환 docx파일을 html파일로 변환을 할 때는 style 적용과 한글이 깨지는 문제가 있다. 텍스트들을 전부 잘 읽기는 하는데 스타일 정보를 제대로 가져오지 못하기 때문에 좀 애매하다 - Headings. - Lists. - Customisable mapping from your own docx styles to HTML. For instance, you could convert WarningHeading to h1.warning by providing an appropriate style ...